
Framing Basement: Essential Guide for Homeowners
- Jul 31, 2024
- 5 min read
Updated: Oct 10, 2025


Quick Summary
This homeowner’s guide explains how to frame a basement step-by-step, from preparation and layout marking to installing studs, insulation, and drywall. Readers will learn the importance of basement framing for structural integrity, moisture prevention, and long-term durability. With detailed insights on materials, tools, and techniques, this guide helps St. Louis homeowners confidently plan and complete a professional-quality basement framing project that adds comfort and value to their home.
Introduction
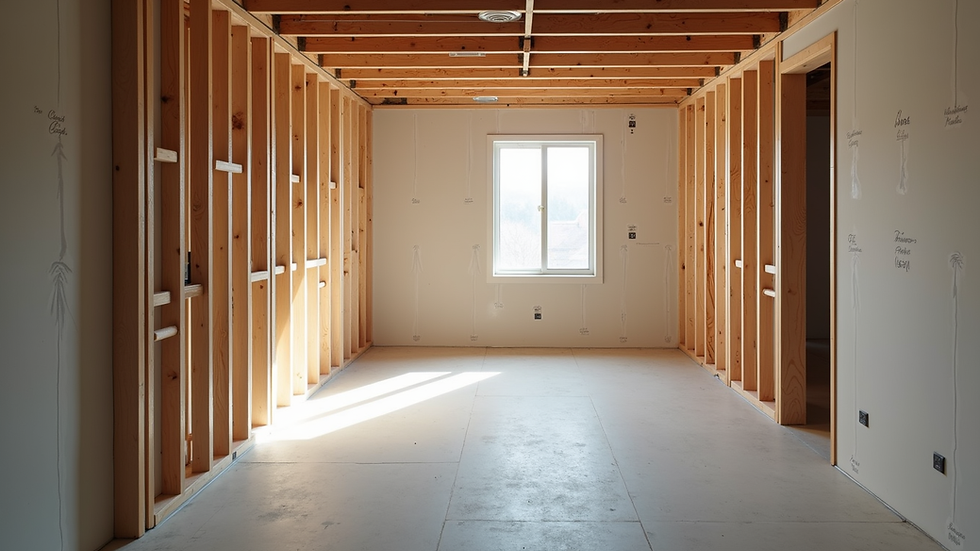
Framing a basement is a crucial step in transforming an unfinished space into a functional living area. Whether you're adding extra bedrooms, a home office, or a recreational area, proper framing ensures the structural integrity and durability of your basement. This guide delves into the essentials of framing a basement, providing detailed insights into the process, materials, and techniques to help homeowners achieve a professional finish.
Understanding the Importance of Framing
Before diving into the specifics, it's essential to grasp why framing is a vital aspect of basement renovation. Framing provides the skeleton for your walls, defining the layout and supporting drywall installation. Proper framing ensures that your walls are straight, plumb, and secure, creating a solid foundation for electrical work, insulation, and finishing touches.
Preparing for Basement Framing
Assessment and Planning
Begin by assessing your basement’s current condition. Check for any signs of moisture, cracks, or structural issues that need addressing before framing. Measure the space accurately and create a detailed plan outlining wall placement, doorways, and any built-in features.
Materials and Tools
Gathering the right materials and tools is crucial for efficient framing. You'll need:
Pressure-treated lumber for bottom plates
Standard lumber for studs and top plates
Nails and screws
A circular saw or miter saw
A hammer and drill
A level and measuring tape
Chalk line and framing square
Building Codes and Permits
Ensure you are familiar with local building codes and obtain any necessary permits before starting your framing project. Adhering to regulations guarantees that your basement renovation is safe and compliant with legal standards.
Step-by-Step Framing Process
Marking the Layout
Use a chalk line to mark the position of your walls on the basement floor. This step ensures that your walls are straight and aligned correctly. Measure and mark the locations for doorways and other openings.
Installing Bottom Plates
Start by installing pressure-treated bottom plates on the floor. Pressure-treated wood is resistant to moisture, preventing potential rot and decay. Secure the plates using concrete nails or anchors, ensuring they are firmly attached.
Erecting Studs
Cut your studs to the appropriate height, typically around 92 5/8 inches for an 8-foot ceiling. Place the studs between the top and bottom plates, spacing them 16 inches apart for standard framing. Use a level to ensure each stud is plumb before securing it with nails or screws.
Top Plates and Bracing
Install the top plates, securing them to the ceiling joists above. Use a framing square to ensure corners are square and add diagonal bracing for extra stability. This step reinforces the structure and prevents walls from bowing.
Framing Doorways and Windows
Frame doorways by adding header beams and jack studs to support the weight above the opening. For windows, install a similar structure, ensuring proper alignment and support. Double-check measurements to ensure that doors and windows fit snugly within the frames.
Ensuring Structural Integrity
Reinforcing with Blocking
Add horizontal blocking between studs to provide additional support for drywall and to accommodate fixtures or cabinetry. Blocking enhances the overall strength of the wall and prevents drywall from bowing over time.
Securing Corners and T-Joints
Pay special attention to corners and T-joints, as these areas require extra reinforcement. Use additional studs and blocking to create a solid connection, ensuring that these critical points are strong and stable.
Insulating and Soundproofing
Choosing Insulation Materials
After framing, the next step is insulation. Choose materials that provide both thermal and sound insulation. Fiberglass batts, foam boards, or spray foam are common choices that help maintain a comfortable temperature and reduce noise transmission.
Installing Insulation
Cut insulation to fit snugly between the studs, ensuring there are no gaps. Secure it in place with insulation supports or adhesive. Proper insulation enhances energy efficiency and comfort in your finished basement.
Finishing Touches
Installing Vapor Barrier
Before adding drywall, install a vapor barrier to prevent moisture from penetrating the walls. This step is crucial in basements, where humidity levels can be higher. Use polyethylene sheets or vapor barrier paint, sealing all seams and edges.
Drywall Installation
Hang drywall sheets horizontally or vertically, securing them to the studs with drywall screws. Be sure to stagger seams and leave a small gap at the floor to prevent moisture damage. Once installed, tape and mud the joints for a smooth finish.
Conclusion
Framing a basement is a complex but rewarding project that lays the foundation for a functional and beautiful living space. By understanding the importance of framing, preparing adequately, and following a step-by-step process, homeowners can achieve professional results. Proper framing not only enhances the structural integrity of your basement but also ensures a comfortable and lasting renovation. With careful planning and execution, your basement can be transformed into a valuable and enjoyable part of your home.
FAQs
What is basement framing?
Basement framing is the process of building the structural framework for walls and ceilings using wood or metal studs. It provides the support for drywall, insulation, and electrical systems in a finished basement.
Why is framing important in a basement renovation?
Framing defines the layout of your basement and ensures walls are straight, secure, and ready for drywall installation. Proper framing also supports insulation and prevents structural issues.
What materials are best for framing a basement?
Pressure-treated lumber is ideal for bottom plates since it resists moisture, while standard wood or metal studs are used for walls and ceilings to provide strength and stability.
Do I need a vapor barrier in my basement framing project?
Yes. Installing a vapor barrier prevents moisture from seeping into the walls, protecting insulation and drywall from mold and water damage — especially in humid basements.
Can I frame my basement myself or should I hire a professional?
DIY framing is possible for skilled homeowners, but hiring professionals ensures precise measurements, compliance with building codes, and lasting structural results
About the Organization
Saint Louis Drywall Pros is a trusted drywall and framing contractor specializing in residential and commercial renovations across the St. Louis area. The company delivers precision workmanship, reliable timelines, and top-quality materials — ensuring that every project, from basement framing to full drywall installation, meets the highest standards of durability and design.
About the Owner
Salem Developments, owner and expert at St. Louis Drywall Pros, has extensive experience in construction, drywall framing, and home renovation. Known for quality craftsmanship and practical expertise, Salem leads projects that combine structural integrity with aesthetic appeal, helping homeowners across St. Louis transform their spaces with confidence.


Comments